
If you live in a Bortle 5 area, in other words, your typical suburban skies where the background glow is always present, astrophotography can feel like trying to listen to a whisper in a noisy room. The good news is that modern cameras, tracking mounts, and processing software are basically purpose-built for this problem. You can absolutely capture impressive nebulae, galaxies, and star fields from your backyard; you just have to build a workflow that accepts light pollution as a constraint instead of treating it like a deal-breaker.
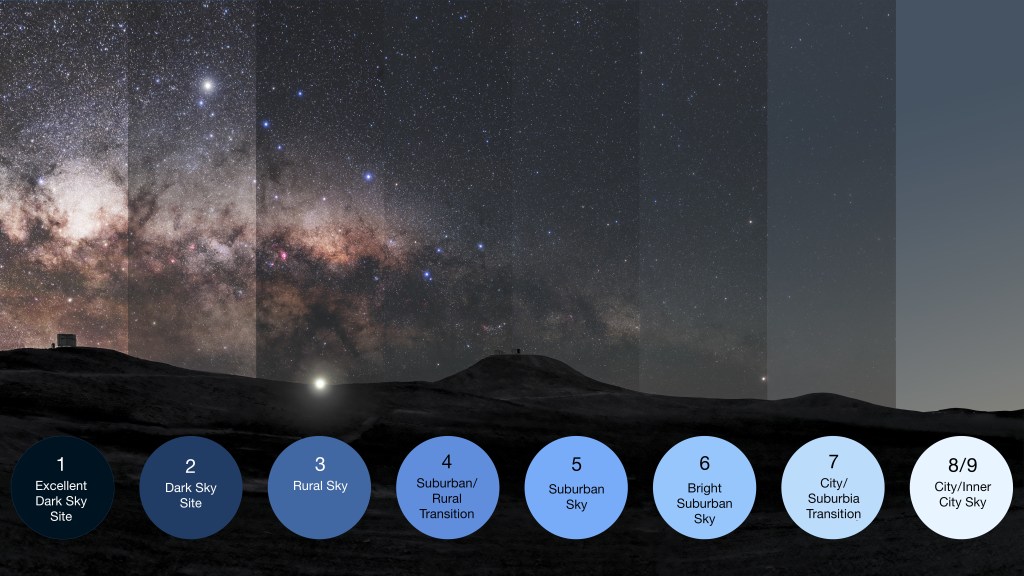
Bellow is a photo I grabbed from wikipedia explaining different sky darkness levels. Bortle 4 and 5 are most common for us living in the hills of SF Bay Area.
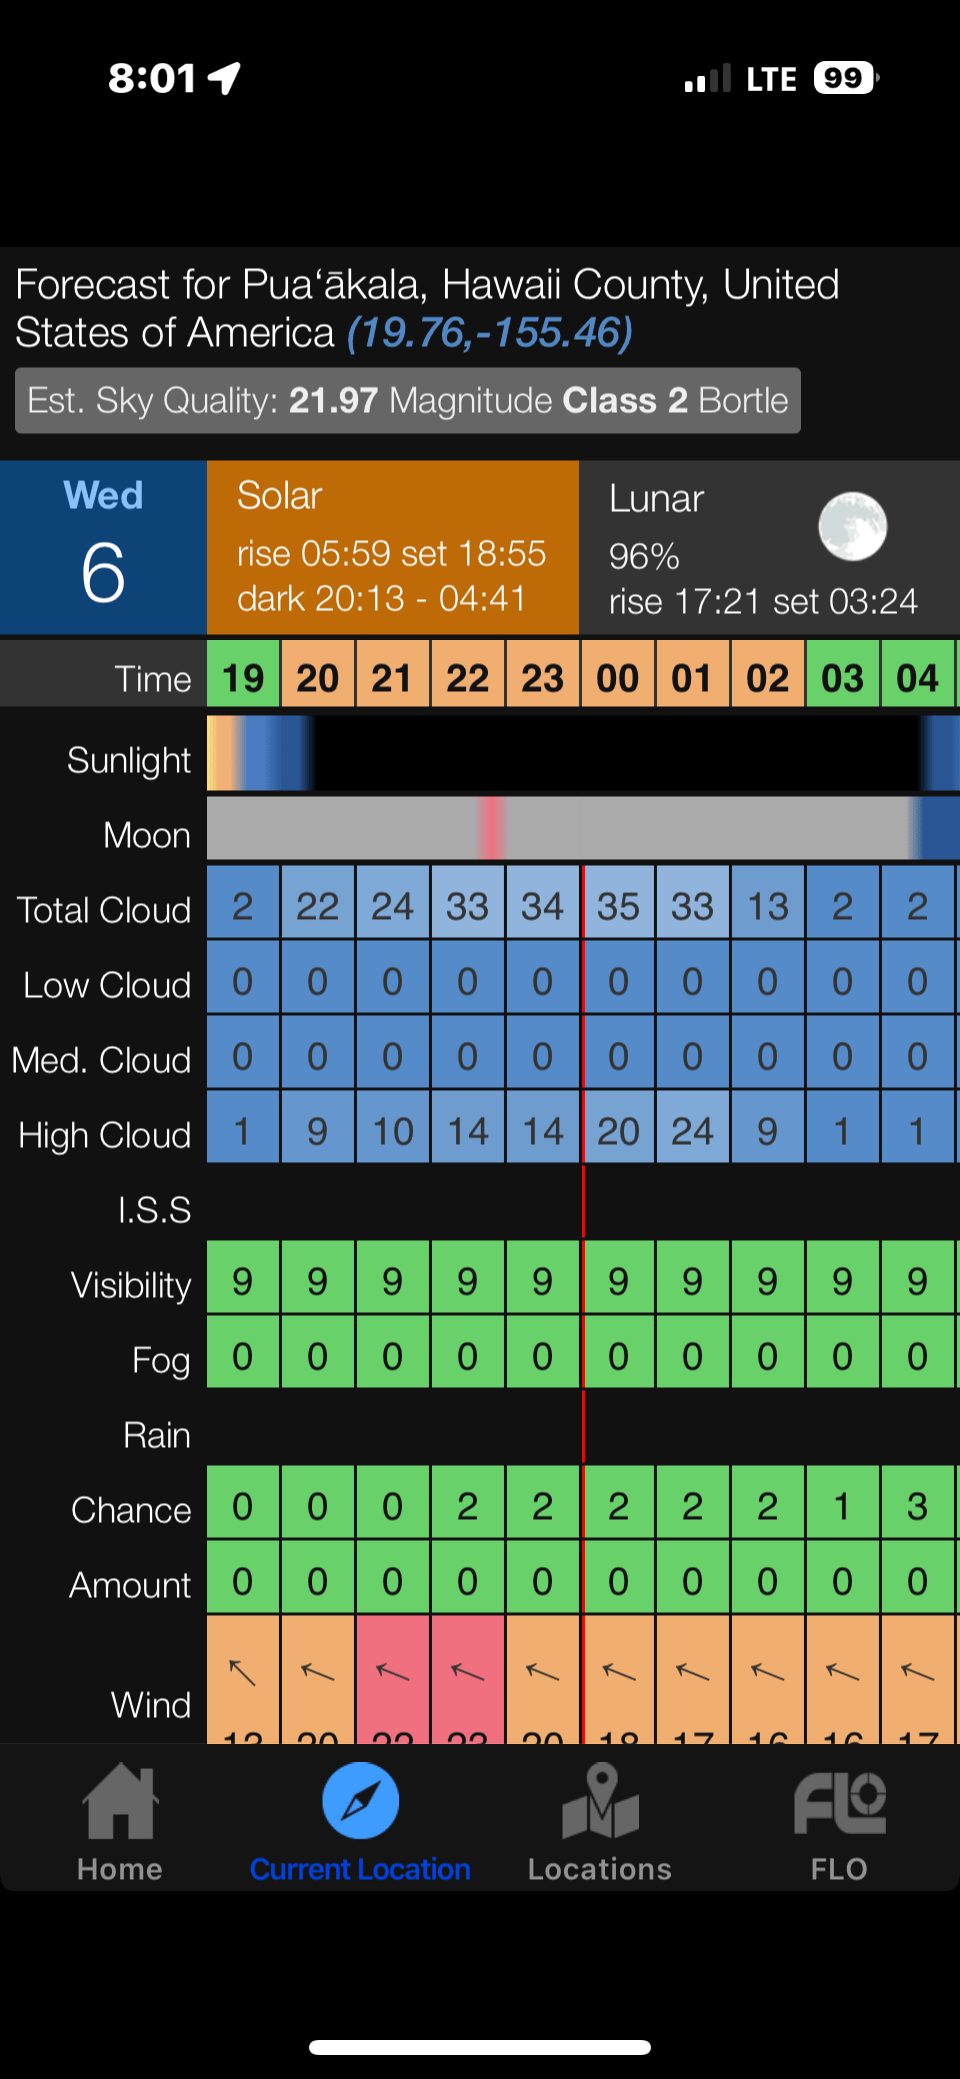
If you are one of the lucky few living in Hawaii and you get to see numbers like these below, then just go outside, lay on your back and enjoy the view 🙂

For the rest of us, the first shift in thinking is understanding that astrophotography isn’t “one photo.” It’s data collection. You take many sub-exposures (“subs”), calibrate them with correction frames, align them, stack them to improve signal-to-noise ratio (SNR), and then process the result to reveal faint structure without turning the sky into a gray soup. Don’t worry by the time you get first decent images you will get to know and fear the soup…. From Bortle 5, that stack-and-process pipeline matters even more because the sky background rises quickly and gradients are everywhere.
Before you even set up gear, get in the habit of planning your night. A site like Light Pollution Map (https://www.lightpollutionmap.info/) tells you what you’re working against, while Clear Outside (https://clearoutside.com/) or Astro-Weather (https://www.astro-weather.com/) helps you pick nights with high transparency. In suburban conditions, transparency is king: haze and humidity scatter city light and crush contrast. Stellarium (https://stellarium.org/) or Telescopius (https://telescopius.com/) can help you choose targets and check framing. This planning step is the hidden advantage of “serious” astrophotography: you’re eliminating the guessing part of the night.
Most people start with a DSLR or mirrorless camera, and that’s still the best on-ramp. Shoot in RAW, learn to focus manually, and learn to interpret a histogram. In Bortle 5, your histogram peak will lift off the left edge quickly because the sky itself is bright. That means you can’t just crank exposure time forever; you’ll clip highlights and waste dynamic range. A better approach is to choose an exposure that puts the background peak around the first quarter to third of the histogram (not hard-clipped), then take many frames. If you want to shoot the Milky Way with only a tripod, you’ll be limited to short exposures to avoid star trails. Instead of the old “500 rule,” use the NPF rule for a more accurate limit based on your focal length, aperture, and pixel size; PhotoPills has a calculator here: https://www.photopills.com/calculators/npf. Even from Bortle 5, stacking a bunch of short, sharp Milky Way frames can produce results that surprise you, especially if you’re intentional about shooting when the Milky Way core is higher and the air is clearer.
The moment you want deep-sky objects—nebulae and galaxies—the single most important upgrade is a tracking mount. A tracker turns the sky from “short snapshots only” into “long integration,” which is where faint detail actually appears. Popular options include the Sky-Watcher Star Adventurer 2i (https://www.skywatcherusa.com/products/star-adventurer-2i-wi-fi) and the iOptron SkyGuider Pro (https://www.ioptron.com/product-p/3550.htm). With a tracker, you can pair a normal camera with a sharp lens—something like a 50mm, 85mm, or 135mm prime—and suddenly targets like Orion (M42), the Rosette Nebula, or the North America Nebula become realistic projects. This “tracker + lens” phase is underrated: it teaches polar alignment, focusing discipline, exposure control, and stacking, without the complexity of a full telescope rig.
In Bortle 5, target selection matters. Bright emission nebulae are your best friends because they respond well to filtering. Galaxies can be done, but they’re often contrast-limited under suburban glow and usually demand more total integration time and more careful background modeling. If you want quick wins early on, start with showpieces like M42 (Orion), M8 (Lagoon), M20 (Trifid), or star clusters like the Pleiades (M45). Telescopius and Astronomy Tools’ field-of-view calculator (https://astronomy.tools/calculators/field_of_view/) help you match target size to your lens or telescope so you don’t end up with a tiny smudge in a huge frame.
As you progress, filters become one of the most powerful “Bortle 5 hacks,” especially if you’re shooting with a color (one-shot-color, or OSC) camera. A dual-band filter passes the important emission lines—primarily H-alpha at 656.3 nm and OIII at 500.7 nm—while rejecting much of the broadband light pollution. That’s why products like the Optolong L-eXtreme (https://optolong.com/) or Antlia ALP-T (https://www.antliafilter.com/) are so popular. With a dual-band filter, you can often run longer sub-exposures (assuming your mount can track well) and produce nebula images with dramatically improved contrast. It doesn’t make light pollution disappear, but it shifts the game back toward signal instead of skyglow.
Eventually, many people move from lenses to a small refractor telescope (often 60–80mm) on a proper equatorial mount. This is where astrophotography starts to look like a “real observatory,” even if it’s in your backyard. At this stage, mount quality becomes the limiting factor. A mount that can carry your imaging rig at roughly 50–70% of its rated capacity will save you frustration and lost data. If you add autoguiding (a small guidescope + guide camera) and run PHD2 (https://openphdguiding.org/), you can keep stars tight over longer exposures and increase your keeper rate. Accurate polar alignment also becomes critical; SharpCap’s polar alignment tool (https://www.sharpcap.co.uk/) is widely used for this on Windows. Oh yes you will need a laptop with Windoze, tools on Linux/MAC are all over the place.
One concept that separates casual shooting from consistent results is calibration frames. Light frames (“lights”) are your actual images, but they include sensor noise, dust shadows, and vignetting. Darks subtract thermal noise and hot pixels, flats correct dust and uneven illumination, and bias or dark-flats help model read noise depending on your camera and workflow. In suburban skies where gradients and background issues are already challenging, clean calibration helps your stacking software extract faint detail without amplifying ugly artifacts. PixInsight’s documentation on calibration frames is a solid reference even if you don’t use PixInsight yet: https://pixinsight.com/doc/docs/CalibrationFrames/CalibrationFrames.html.
Then comes stacking and processing—the phase where many beginners assume the camera “failed,” when in reality the data just isn’t finished. For stacking, DeepSkyStacker (free, Windows) is a classic starting point (http://deepskystacker.free.fr/english/index.html), while Siril (https://siril.org/) is free, powerful, and cross-platform. Processing is where Bortle 5 images are won or lost because gradients from light pollution can dominate the frame. Tools like GraXpert (https://graxpert.com/) are incredibly effective for background extraction and gradient removal, and that single step often turns a washed-out stack into a usable image. More advanced imagers often use PixInsight (https://pixinsight.com/), which has industry-standard tools for dynamic background extraction, photometric color calibration, and noise reduction in the linear stage. Many also use star-removal workflows (StarNet: https://www.starnetastro.com/) to process nebula structures and star fields separately, which can be especially helpful when suburban sky conditions make the stars bloat and overwhelm faint nebulosity.
If you want a realistic progression path from Bortle 5, think in terms of controlling variables. First you learn basic capture and focus. Then you add tracking so you can collect enough integration time. Then you learn calibration and stacking so your data is clean. Then you learn gradient removal and color calibration so the sky stops fighting you. At each step, you’re not just buying gear—you’re reducing uncertainty and increasing repeatability.
The best mindset shift is this: your goal is not a single perfect exposure. Your goal is a high-quality dataset. In Bortle 5, that usually means shorter subs than someone in Bortle 2, but more of them, and more attention to background modeling during processing.


Leave a comment